We create content for the University website using templates we call 'content types'.
Before you create a page in Typecase, you need to choose a content type for your content. Each content type gives you a choice of components you can use to structure your content on the website. You should choose the most appropriate content type for your content, not the one with the components you prefer.
Choosing the correct content type for content will automatically enhance its accessibility for all visitors to our site, regardless of their ability.
Read about digital accessibility and why it's important.
As well as the components specific to each content type, there are core components that appear on all content types (with some exceptions).
Use these core components to set up your page template.
User need
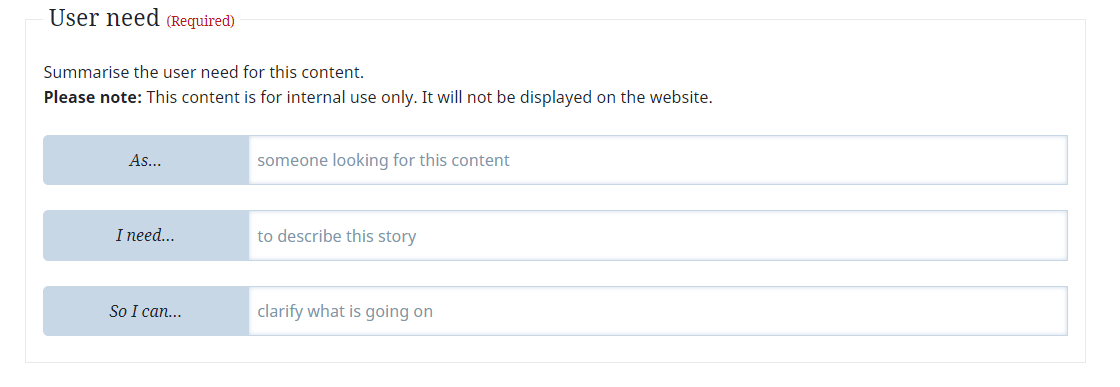
Every content item in Typecase must have a user need, which we write in a format called a user story.
A user story helps you focus on the purpose of your content and make sure the information on the page meets the user need.
To write a user story, describe who a user is, what they need to achieve, and why. Write this from the user's perspective using the structure:
As… [the type of user/role]
I need… [the goal]
So I can… [the reason/benefit of the content]
In the first line, describe the person visiting the website, not yourself. For example, you could use, 'As a new student'.
The 'I need' part is their goal, for example, 'I need to find out what sports clubs are available'. This is the task they want to achieve and why they've come to this page on the website. Writing this helps you make sure you're solving the right problem with your content.
The third part, 'So I can', is the reason the user is trying to complete a task, for example 'So I can join a sports club'. This is the benefit they get from completing the task and can also suggest the next steps they need to take, helping us create user journeys for our content.
Add your user story to the User needs fields near the top of the Typecase edits screen.
In most cases, each content item should only meet one user need. Some pages cover more than one need if those needs are similar or related. However, you should split the content over multiple pages if people are more likely to look for answers to their needs separately.
Do not create Frequently Asked Questions (FAQs) pages on the University website. FAQ pages cover too many user needs on one page and make information difficult for users to find.
Read more about creating user stories.
Title and summary

Every content item in Typecase must have a title and summary.
Title
Page titles tell people what the page is about and what type of information they’ll find there.
You must write clear and descriptive page titles to comply with the government’s accessibility regulations.
Titles appear with the page summary in search results, filtered lists, and where the page is pinned to another page. The page title also forms part of the page's URL, which means changing a page's title will change its web address and cause broken links.
Adding a page title
To add a page title, add it to the Title field.
The Title field allows up to 100 characters, including spaces. This is so the end of your page title isn't cut off when it appears in search results on sites like Google.
Summary
Use the page summary to expand on, not repeat, the information in the title.
Make sure you write detailed page summaries to help people decide whether the page is right for them.
Summaries appear with the page title in search results, filtered lists, and where the page is pinned to another page.
Adding a page summary
Add your page summary to the Summary field.
The Summary field allows up to 160 characters, including spaces.
Labels

Only Typecase Admins and Editors can add Labels to content items.
You can add Labels to all content types.
You should only add Labels to a content item if you need to:
Don't add Labels as if they're keywords or blog tags. This could make your content item appear in places it shouldn't be.
Read more about using Labels in Typecase.
Navigation

You can add navigation to:
- Campaigns
- Case studies
- Corporate information
- Events
- Forms
- Guides
- Landing pages
- Legal information
- Projects
- Publications
- Topics
Global navigation
Your page will automatically include the top navigation bar of the University website. This is called the 'Global navigation'. It appears on every page of the website and can only be edited by the Digital Development team.
The Global navigation shows links to the top-level pages about:
In Typecase, you can choose which of these areas your page fits into by selecting one of them from the drop-down list under 'Global navigation'.
If you choose Courses, Research, Enterprise, Sport, Departments, or About, the link text in the Global navigation bar on the website changes colour to show people which of these your page relates to.
Local navigation
You can include a Local navigation bar on your page to give people quick access to lots of related web pages.
Before you can add a Local navigation, you need to create a Navigation section as a separate content item.
Only Typecase Admins can create Navigation sections. Only Admins and Editors can edit them.
When you've created a Navigation section, you can add it to your page as a Local navigation. The Local navigation appears below the Global navigation on your page.
To add a Local navigation, choose whether to:
- use the Owning organisationʼs default navigation section - select this option to add the default Navigation section for the department or team which owns the page
- choose a navigation section that isnʼt set as default for your department or team - you can then find the Navigation section you want in the drop-down list
You can also choose not to add a Local navigation.
Owning and associated organisations

All content items on the University website are owned by an Organisation or Group. These represent the parts of the University, like the faculties, departments, and teams.
When you create a page in Typecase, it will automatically be owned by your primary organisation. This is usually the department or team you work in at the University.
Changing an Owning organisation
You can only change an Owning organisation if you're an Admin or an Editor in Typecase. Email web-support@bath.ac.uk if you need help changing an Owning organisation.
If you change a page's Owning organisation, Typecase users in the old Owning organisation will lose access to the page. The page will also disappear from any Landing pages and filtered lists owned by the old Owning organisation.
Changing the Owning organisation will also change the default Local navigation for the page.
To change the Owning organisation, select the new organisation's name from the drop-down menu under 'Owning Organisation or Group'.
Adding an Associated organisation
If you need to share the content item with another organisation or group, you should add them as an Associated organisation.
This will give Typecase users in that organisation or group access to edit the content, and allow them to pin the content item to their Case studies, Landing pages, and Projects.
To add an Associated organisation, select the organisation or group from the list under 'Associated Organisations and Groups'. To select more than one Associated organisation, hold 'Control' ('Ctrl') for Windows or 'Command' ('Cmd ⌘') for Mac before clicking on the next organisation or group.
To deselect an organisation or group, hold 'Control' or 'Command' and click on the organisation or group.
University network only pages

On some content types, you need to choose whether or not to restrict access to your page so it's only visible to people on the University network.
To see a 'University network only' page, users need to be connected to our network or signed in to our Virtual Private Network (VPN). If you make a page University network only, it means:
- the URL will change because '.bho' will be added to it
- the page won't appear in any search results
- you can still pin the page to a Topic or Landing page
You must only make a page University network only if the content has to go on the website but cannot be shown to anyone outside the University. You must not use it if you just think your content isn't aimed at other people.
Content types with University network only
You can restrict access to:
- Announcements
- Corporate information
- Forms
- Guides
- Legal information
- Projects
- Publications
- Topics
Making a page University network only
The option to make a page University network only will appear near the bottom of the edit screen after you first save your page.
Select the radio button next to:
- 'Yes' to make a page University network only
- 'No' to make it visible to anyone
Save, preview, and publish
Typecase doesn't automatically save edits to content, so you need to click one of the 'Save' buttons or the 'Publish' button before you close Typecase or navigate away from the edit screen. If you don't click 'Save' or 'Publish', you'll lose any new changes you've made.
If you don't want to save or publish your changes, you can click 'Cancel' at the bottom of the page, close your browser, or click the 'back' button on your browser without clicking 'Save' or 'Publish'.
Saving your content
To save a draft of your content, click the 'Save' button at the bottom of the page. This will record all your changes and keep the template open on your screen. This will also create or update the preview version of your page but will not publish anything new to the live website.
You can also click the 'Save and close' button to save your progress and return to the list of your organisation's content items.
Preview your page
When you create or edit a page in Typecase, you must check the preview page yourself. You must also ask a colleague to review the page because they're more likely to find errors you've made while creating or editing the content.
To see the preview page:
- Save your latest changes.
- Click 'View preview page' at the top of the Typecase template - this will open a new browser tab with a preview of your page.
Preview page URLs are the same as published page URLs except that they begin 'https://preview.bath.ac.uk' instead of 'https://www.bath.ac.uk'.
Depending on how busy our server is, it can take a minute or two for the preview page to appear or update.
Check the preview page to check:
- the information is correct
- there are no spelling or grammar mistakes
- images and other media appear correctly
- formatting is accessible and appears correctly
- links are going to the right pages
Fix any errors you find, save the page, and then ask a colleague to review the updated preview page. Send them the link to our guide to reviewing web content to help them check everything is correct.
Fix the errors your colleague found in their review, then show them the preview page again. When they can't see any more errors on the preview page, you can publish your content.
Publishing your content
To publish a content item, you must have Author, Editor, or Admin access on Typecase. You can't publish content if you're a Contributor. Find out more about levels of Typecase user access.
Click the 'Publish' button at the bottom of the Typecase template to add your page to the live website.
Depending on how busy our server is, it can take a minute or two for the page to appear or update on the live site.
Schedule publishing
If you're creating an Announcement page, you can schedule publishing for a later date and time.