When to use the Narrative component
Use a Narrative component to add the main body of text to your page. Each Narrative has Content sections to help you structure your text.
You can use the Narrative component on a:
- Case study
- Event
- Guide
- Project
Creating accessible content
You must make sure your content is accessible.
As a public sector body, we're legally required to make the content on our website as accessible as possible. The government checks our content to make sure it complies with the internationally recognised guidelines from the World Wide Web Consortium (W3C).
Find out more about accessibility or contact beta-content@bath.ac.uk if you have any questions.
Finding the Narrative component
Case studies, Events, and Projects
On Case study and Project pages, you need to add at least one, and no more than two, Narratives. You can add up to eight Content sections (called Project details on Project pages) to each Narrative.
On Event pages, you can add up to two Narratives, each with up to eight Content sections.
To find the component in the Case study, Event, or Project templates:
- Open the drop-down menu under 'Drag and drop components'.
- Select 'Narrative'.
- Click 'Add component'.
The Narrative will appear beneath 'Component(s) currently in use'.
Guides
On Guide pages, you can add one Narrative and up to 20 Content sections.
To find the component in the Guide template:
- Open the drop-down menu under 'Top of page fixed-position components'.
- Select 'Narrative'.
- Click 'Add component'.
The Narrative will appear beneath 'Component(s) currently in use'.
Adding content to the Narrative component

You can type directly into the text fields or copy and paste text from somewhere else, like a Word document.
Use Markdown to format your text, for example, to create headings, bullet points, and links.
Lead paragraph
You can choose whether or not to add text to the 'Lead paragraph content' field. If you do, this should introduce the Content sections that follow and not just repeat the page summary.
Content sections
Use Content sections to make your content clear and accessible to users. This includes using headings to structure your content in a logical way so users can navigate between sections on the page.
Click the 'Add content section' button (or 'Add project detail' on Project pages) to create the Section heading and Body copy text fields.
Section headings
Use the Section heading field (or 'Project detail heading' on Project pages) to write a heading that clearly and succinctly explains the content that follows.
Typecase formats the Section heading as h1 so, if you add a subheading to the Body copy text field (using Markdown) it must be h2.
On Guide pages, section headings also appear as in-page navigation links. Users can click on these links to navigate to a specific section on the Guide.

Body copy
Type or paste your text into the Body copy text field (or 'Project detail content' field on Project pages).
You can see the character limit for the field in the microcopy above the text field. The character limit depends on the content type you're using. Typecase includes Markdown, spaces, and line breaks when counting characters.

Associated images or media embeds
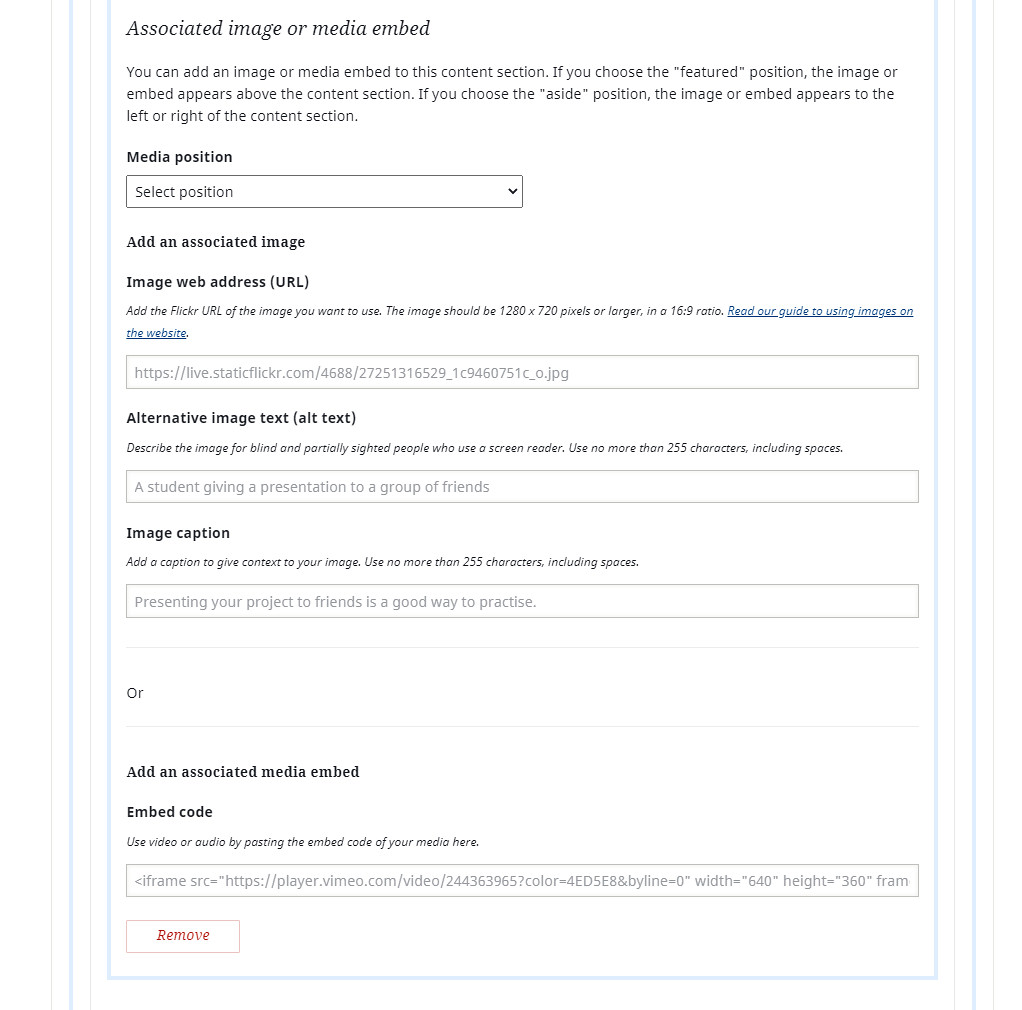
If you have an associated image or other media, like a video, you can embed this in each Content section.
You must only embed accessible video or audio content. Make sure you add captions to videos and provide transcripts of audio files so that everyone has access to the same content.
Use the 'Media position' drop-down to select whether the image or media appears in the:
- 'featured' position, above the body copy on the page
- 'aside' position, to the left or right of the body copy on the page

Add an image
Add the image web address, alternative text, and caption to the fields beneath 'Add an associated image'.
Add a media embed
Add the media embed link to the field beneath 'Add an associated media embed'.
Make sure your iframe embed is accessible.
Find out about embedding:
Things to avoid
Don't put all your text into one Content section. It's clearer and easier to read if you separate your content into different sections with appropriate headings.
Good examples of Narrative sections in use are:
Moving your content around the page
You can drag and drop each Content section to change the order they appear in a Narrative.
In Case study, Event, and Project templates, you can also drag and drop each Narrative to reorder the components on a page.
Click 'Collapse this section' to hide a Narrative component or each of its Content sections while you work on other areas of the page. The content will still appear on the preview and published pages if you collapse part of the template.